

Launch APINEW
Run in SwaggerIntroduction
Overview
The Launch API lets you manage all the resources (Projects, Environments and Deployments) in your Launch project using REST API. This documentation provides information on endpoints, operations, parameters, and responses for the Contentstack Launch API.
Base URLs
For Launch API(s)
- AWS US (North America, or NA): https://launch-api.contentstack.com
- AWS Europe (EU): https://eu-launch-api.contentstack.com
- AWS Australia (AU): https://au-launch-api.contentstack.com
- Azure North America (Azure NA): https://azure-na-launch-api.contentstack.com
- Azure Europe (Azure EU): https://azure-eu-launch-api.contentstack.com
- GCP North America (GCP NA): https://gcp-na-launch-api.contentstack.com
- GCP Europe (GCP EU): https://gcp-eu-launch-api.contentstack.com
Authentication
Contentstack provides you with two ways to authenticate the API requests:
- Contentstack OAuth: The Contentstack OAuth server generates access tokens for both users and apps (Machine-to-Machine), allowing client applications to access restricted data on behalf of the resource owner. Read more about how to generate a Contentstack OAuth token.
- Authtoken: A user-specific session token, used to make authorized Launch requests.
OAuth Token-based Authentication
- Pass the OAuth Token value against the Authorization parameter as header.
Example:
Authorization: Bearer <access_token>
OAuth Scopes for Launch APIs
| Scopes | Description | APIs | Supports Tokens |
| launch:manage | This scope lets you read, update, and manage resources | Get all Projects | user token, app token |
| Get a Project | user token, app token | ||
| Create a Project (Using Git Provider) | user token | ||
| Create a Project (Using File Upload) | user token, app token | ||
| Update a Project | user token, app token | ||
| Delete a Project | user token, app token | ||
| Get all Environments | user token, app token | ||
| Get an Environment | user token, app token | ||
| Create an Environment (Using Git Provider) | user token | ||
| Create an Environment (Using File Upload) | user token, app token | ||
| Update an Environment | user token, app token | ||
| Delete an Environment | user token, app token | ||
| Revalidate CDN Cache | user token, app token | ||
| Get a Signed Upload URL for a Project | user token, app token | ||
| Get a Signed Upload URL for an Environment | user token, app token | ||
| Get a Signed Upload URL for a Deployment | user token, app token | ||
| Get a Download URL for the Uploaded File | user token, app token | ||
| Get all Deployments | user token, app token | ||
| Get a Deployment | user token, app token | ||
| Create a Deployment (Using Git Provider) | user token | ||
| Create a Deployment (Using Previously Uploaded File) | user token, app token | ||
| Create a Deployment (Using Newly Uploaded File) | user token, app token | ||
| Get Deployment Logs | user token, app token | ||
| Get Server Logs | user token, app token | ||
| launch.projects:read | This scope lets you read resources | Get all Projects | user token, app token |
| Get a Project | user token, app token | ||
| Get all Environments | user token, app token | ||
| Get an Environment | user token, app token | ||
| Get all Deployments | user token, app token | ||
| Get a Deployment | user token, app token | ||
| Get a Download URL for the Uploaded File | user token, app token | ||
| Get Deployment Logs | user token, app token | ||
| Get Server Logs | user token, app token | ||
| launch.projects:write | This scope lets you create and update resources | Create a Project (Using Git Provider) | user token |
| Create a Project (Using File Upload) | user token, app token | ||
| Get a Signed Upload URL for a Project | user token, app token | ||
| Update a Project | user token, app token | ||
| Create an Environment (Using Git Provider) | user token | ||
| Create an Environment (Using File Upload) | user token, app token | ||
| Get a Signed Upload URL for an Environment | user token, app token | ||
| Update an Environment | user token, app token | ||
| Create a Deployment (Using Git Provider) | user token | ||
| Create a Deployment (Using Previously Uploaded File) | user token, app token | ||
| Create a Deployment (Using Newly Uploaded File) | user token, app token | ||
| Get a Signed Upload URL for a Deployment | user token, app token | ||
| Revalidate CDN Cache | user token, app token | ||
| launch.projects:delete | This scope lets you delete resources | Delete a Project | user token, app token |
| Delete an Environment | user token, app token |
Auth Token-based Authentication
- Pass the user Authtoken against the authtoken parameter as header.
- Pass the organization UID against the organization_uid parameter as header.
Example:
authtoken: <authtoken>
organization_uid: blt483xxxxxxx3589
Authtokens vs OAuth Token
An Authtoken is a read-write token used to make authorized Contentstack Launch API requests, and it is a user-specific token. This means that your personal user details are attached to every API request that you make using the authtoken. So, if a person were to obtain access to your authtoken, and knew the Project UID, this person would be able to make API requests that appeared to be coming from you.
Contentstack OAuth employs the OAuth 2.0 protocol, enabling external applications to access Contentstack APIs on behalf of users. It issues access tokens (User and App tokens) to client applications, allowing them to retrieve restricted data from the Contentstack resource server without the need for the resource owner to share their credentials. Learn more about Contentstack OAuth and OAuth Scopes.
For Launch APIs, we recommend using the Contentstack OAuth tokens.
Note: When trying out POST/PUT calls, in addition to the Project UID and Authtoken, you must pass Content-Type:application/json in the Header.
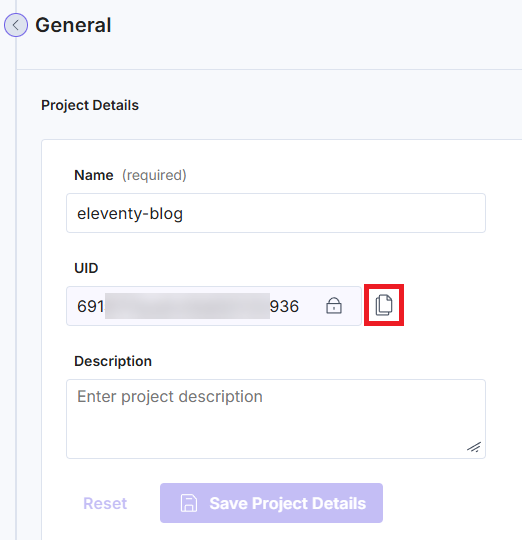
How to Get Project UID
To retrieve the project UID, perform the steps given below:
- Navigate to Launch > your preferred project.
- Click the Settings icon in the top navigation panel.
- In the General tab, under Project Details, you will find the 24-character project UID.
- Click the Copy icon to copy the project UID to your clipboard which will be used for the API calls.
How to Get Authtoken
To retrieve the authtoken, log in to your Contentstack account by using the "Log in to your account" request under "User Session". This request will return the authtoken in the response body.
You can generate multiple authtokens by executing the "Log in to your account" request multiple times. These tokens do not have an expiration time limit. However, currently, there is a maximum limit of 20 valid tokens that a user can use per account at a time, to execute the Launch API requests.
Warning: If you already have valid 20 tokens, creating a new authtoken will automatically cause the oldest authtoken to expire without warning.
For SSO-enabled organizations, the "Log in to your account" request will not return the user authtoken for users who access the organization through Identity Provider login credentials. Consequently, any requests that require user authtoken will not work. Only the owner of the organization and users with permission to access the organization without SSO can use the Launch APIs. Learn more about REST API Usage.
How to Get OAuth Tokens
To get the OAuth Token, perform the steps given within the Configuring Contentstack OAuth section after logging into your Contentstack account.
Note: Only the organization Owners and Admins can create OAuth Tokens.
Rate Limiting
Rate limit is the maximum number of requests you can make using Contentstack’s APIs in a given time period.
By default, the Launch API enforces the following rate limits:
- Launch Read (GET) and Manage (POST/PUT/PATCH) requests: 10 requests per second per organization.
Your application will receive the HTTP 429 response code if the requests for a given time period exceed the defined rate limits.
The aforementioned limits are configurable depending on your plan. For more information, contact our support team.
API Conventions
- Currently, the base URL for Launch API is available for all the regions and can be found in the Base URLs section.
- Launch API supports GET/POST/PUT/DELETE verbs or methods.
- URL paths are written in lowercase.
- Query parameters and JSON fields use camel case. For example: uploadUid
- The success/failure status of an operation is determined by the HTTP status it returns. Additional information is included in the HTTP response body.
Errors
If there is something wrong with the API request, Contentstack returns an error.
Launch uses conventional, standard HTTP status codes for errors, and returns a JSON body containing details about the error. In general, codes in the 2xx range signify success. The codes in the 4xx range indicate error, mainly due to information provided (for example, a required parameter or field was omitted). Lastly, codes in the 5xx range mean that there is something wrong with Contentstack’s servers; it is very rare though.
Let’s look at the error codes and their meanings.
| HTTP status code | Description |
|---|---|
| 400 Bad Request | The request was incorrect or corrupted. |
| 401 Access Denied | The login credentials are invalid. |
| 403 Forbidden Error | The page or resource that is being accessed is forbidden. |
| 404 Not Found | The requested page or resource could not be found. |
| 409 Conflict | Resources with the same name already exist. |
| 500 Internal Server Error | The server is malfunctioning and is not specific about what the problem is. |
| 502 Bad Gateway Error | A server received an invalid response from another server. |
| 504 Gateway Timeout Error | A server did not receive a timely response from another server that it was accessing while attempting to load the web page or fill another request by the browser. |
Note: The error codes that we get in the JSON response are not HTTP error codes but are custom Contentstack error codes that are used for internal purposes.
Using OpenAPI Files
Contentstack provides the OpenAPI files of Contentstack’s Launch APIs that you can use to try out Contentstack APIs on any OpenAPI platform such as Swagger. You can download the OpenAPI JSON file of the Launch API and open it on Swagger Editor to start using it.
To use Contentstack Launch APIs with Swagger, perform the following steps:
- Download the JSON file from the above endpoints and go to Swagger Editor.
- On the Swagger Editor page, click File, and select the Import file option.
Region-specific OpenAPI URLs
- AWS NA: https://launch-api.contentstack.com/openapi
- AWS EU: https://eu-launch-api.contentstack.com/openapi
- AWS AU: https://au-launch-api.contentstack.com/openapi
- Azure NA: https://azure-na-launch-api.contentstack.com/openapi
- Azure EU: https://azure-eu-launch-api.contentstack.com/openapi
- GCP NA: https://gcp-na-launch-api.contentstack.com/openapi
- GCP EU: https://gcp-eu-launch-api.contentstack.com/openapi
API Reference
Projects
Launch Projects provide a fully managed front-end hosting and deployment solution within Contentstack. It enables you to connect your Git repository, configure build settings, and automatically deploy web projects with seamless integration, scalability, and minimal downtime.
Get all Projects
The Get all Projects request fetches the list of all projects in your organization.
Create a Project
The Create Project request creates a project in Launch using either a Git Provider or File Upload.
Create a Project by FileUpload:
{
  "name": "Sample file upload project",
  "environment": {
    "name": "Test Environment",
    "outputDirectory": "./_site",
    "frameworkPreset": "OTHER",
    "description": "It is a test environment.",
    "buildCommand": "npx @11ty/eleventy",
    "environmentVariables": [],
    "autoDeployOnPush": true
  },
  "projectType": "FILEUPLOAD",
  "description": "Sample description",
  "fileUpload": {
    "uploadUid": "50xxxxa8"
  }
}
To create a project using FileUpload, you must run the following APIs step-by-step:
1. [Get a Signed Upload URL for a Project](https://www.contentstack.com/docs/developers/apis/launch-api#get-a-signed-upload-url-for-a-project).
2. [Upload your ZIP file to Launch](https://www.contentstack.com/docs/developers/launch/upload-your-deployment-zip-file-to-launch) (The signed URL is valid only for 10 minutes).
Get a Project
The Get a Project request fetches a specific project in Launch using the project_uid path parameter.
Update a Project
The Update a Project request lets you update an existing project in your organization.
Delete a Project
The Delete a Project request lets you delete an existing project in your organization.
Environments
Launch environments help you deploy and manage different versions of your project independently. Each environment is auto-deployed to a unique URL and can be customized to match your development workflow.
Get all Environments
The Get all Environments request fetches the list of all environments in your project.
Create an Environment
The Create Environment request lets you create a new environment in your Launch project.
Create an Environment by FileUpload:
{
  "name": "Test Environment",
  "outputDirectory": "./",
  "frameworkPreset": "OTHER",
  "description": "It is a test environment.",
  "uploadUid": "8dxxxxxx00",
  "buildCommand": "npm run build",
  "serverCommand": "npm run start",
  "environmentVariables": [
    {
      "key": "key1",
      "value": "value1"
    }
  ],
  "autoDeployOnPush": true
}
To create an environment using FileUpload, you must run the following APIs step-by-step:
1. [Get a Signed Upload URL for an Environment](https://www.contentstack.com/docs/developers/apis/launch-api#get-a-signed-upload-url-for-an-environment).
2. [Upload your ZIP file to Launch](https://www.contentstack.com/docs/developers/launch/upload-your-deployment-zip-file-to-launch) (The signed URL is valid only for 10 minutes).
Get an Environment
The Get an Environment request fetches a specific environment from a project in Launch using the project_uid and environment_uid path parameters.
Delete an Environment
The Delete an Environment request lets you delete an existing environment in your project.
Update an Environment
The Update an Environment request lets you update an existing environment in your project.
Revalidate CDN Cache
The Revalidate CDN Cache request lets you view the latest content after changes to your environment. The CDN checks for updates and fetches fresh content from the origin server if needed, without manually purging the cache. This helps maintain consistency across all domains sharing the same CDN configuration.
Purge cache of a specific path:
{
  "cachePath": {
    "path": "/blog",
    "isPrefix": false
  }
}
Use the cachePath object with isPrefix set to false to purge the cache for an exact path (e.g., /blog).
Purge cache by cache tags:
{
  "cacheTags": [
    "blogs"
  ]
}
Use cacheTags to purge the cache for routes tagged with specific cache tags.
Purge cache for specific hostnames:
{
  "hostnames": [
    "test.contentstackapps.com"
  ]
}
Use hostnames to purge the cache for specific hostnames.
File Upload
The File Upload URL APIs provide secure, pre-signed URLs for uploading ZIP files to Launch.
Get a Signed Upload URL for a Project
The Get a Signed Upload URL for a Project request fetches the details of the signed URL where you must upload the file while creating a project.
As the next step, [Upload Your Deployment Zip File to the Signed URL](https://www.contentstack.com/docs/developers/launch/upload-your-deployment-zip-file-to-launch).
Get a Signed Upload URL for an Environment
The Get a Signed Upload URL for an Environment request fetches the details of the signed URL where you must upload the file when creating an environment.
As the next step, [Upload Your Deployment Zip File to the Signed URL](https://www.contentstack.com/docs/developers/launch/upload-your-deployment-zip-file-to-launch).
Get a Signed Upload URL for a Deployment
The Get a Signed Upload URL for a Deployment request retrieves the details of the signed URL where you must upload the file when creating or redeploying a deployment.
As the next step, [Upload Your Deployment Zip File to the Signed URL](https://www.contentstack.com/docs/developers/launch/upload-your-deployment-zip-file-to-launch).
Get a Download URL for a Deployment
The Get a Download URL for the Uploaded File request returns the signed URL to download the uploaded file from the latest deployment.
Deployments
Launch Deployments let you build, preview, and manage your project deployments seamlessly in real time. Whether you are importing code from a Git repository or uploading a ZIP file, each deployment provides detailed insights into build status, logs, and redeployment options—helping you track and manage every release with confidence.
Get all Deployments
The Get all Deployments request fetches the list of all deployments within a specific environment of your project.
Create a Deployment
The Create Deployment request lets you create a new deployment in your Launch project.
Create a Deployment Using a Previously Uploaded File:
{}To create a deployment using a previously uploaded file, the system uses the most recent file uploaded to your project.
Create a Deployment Using a Newly Uploaded File:
{
  "uploadUid": "133xxxxbe8"
}
To create a deployment using FileUpload, you must run the following APIs step-by-step:
1. [Get a Signed Upload URL for a Deployment](https://www.contentstack.com/docs/developers/apis/launch-api#get-a-signed-upload-url-for-a-deployment).
2. [Upload your ZIP file to Launch](https://www.contentstack.com/docs/developers/launch/upload-your-deployment-zip-file-to-launch) (The signed URL is valid only for 10 minutes).
Get a Deployment
The Get a Deployment request retrieves a specific deployment from an environment of your project in Launch using the project_uid, environment_uid, and deployment_uid path parameters.
Deployment Logs
Deployment logs provide detailed build and deployment information for your Launch deployments. These logs help you track the build process, identify issues during deployment, and monitor the status of your deployments in real time.
Get Deployment Logs
The Get Deployment Logs request fetches the deployment logs of a specific deployment of an environment of your project in Launch using the project_uid, environment_uid, and deployment_uid path parameters.
Server Logs
Server logs capture runtime information from your deployed apps. These logs help you monitor app performance, debug runtime issues, and track server-side events for your Launch deployments.
Get Server Logs
The Get Server Logs request fetches the server logs of a specific deployment of an environment of your project in Launch using the project_uid, environment_uid, and deployment_uid path parameters.
